Monday, July 19, 2010

Solar powered lamp revamp


Purchased a solar powered lamp typically used for outdoor path illumination and did a revamp. (now on sale, doggone it!)

A too-rusty shelf bracket was lightly covered with flat black spray paint then lightly wiped with dried leaves. Why the wipe? Dunno, I saw the leaves on my work surface in the garage and a voice in my head wondered if they would knock down the too-perfect black. Yep, it worked. Who knew? One of the myriad of craft personalities living in my head, that's who!

With an embellishment of some Rub and Buff stuff,


highlights of gold are added.


The too-perfect and too-black

hanging lamp received the same treatment.


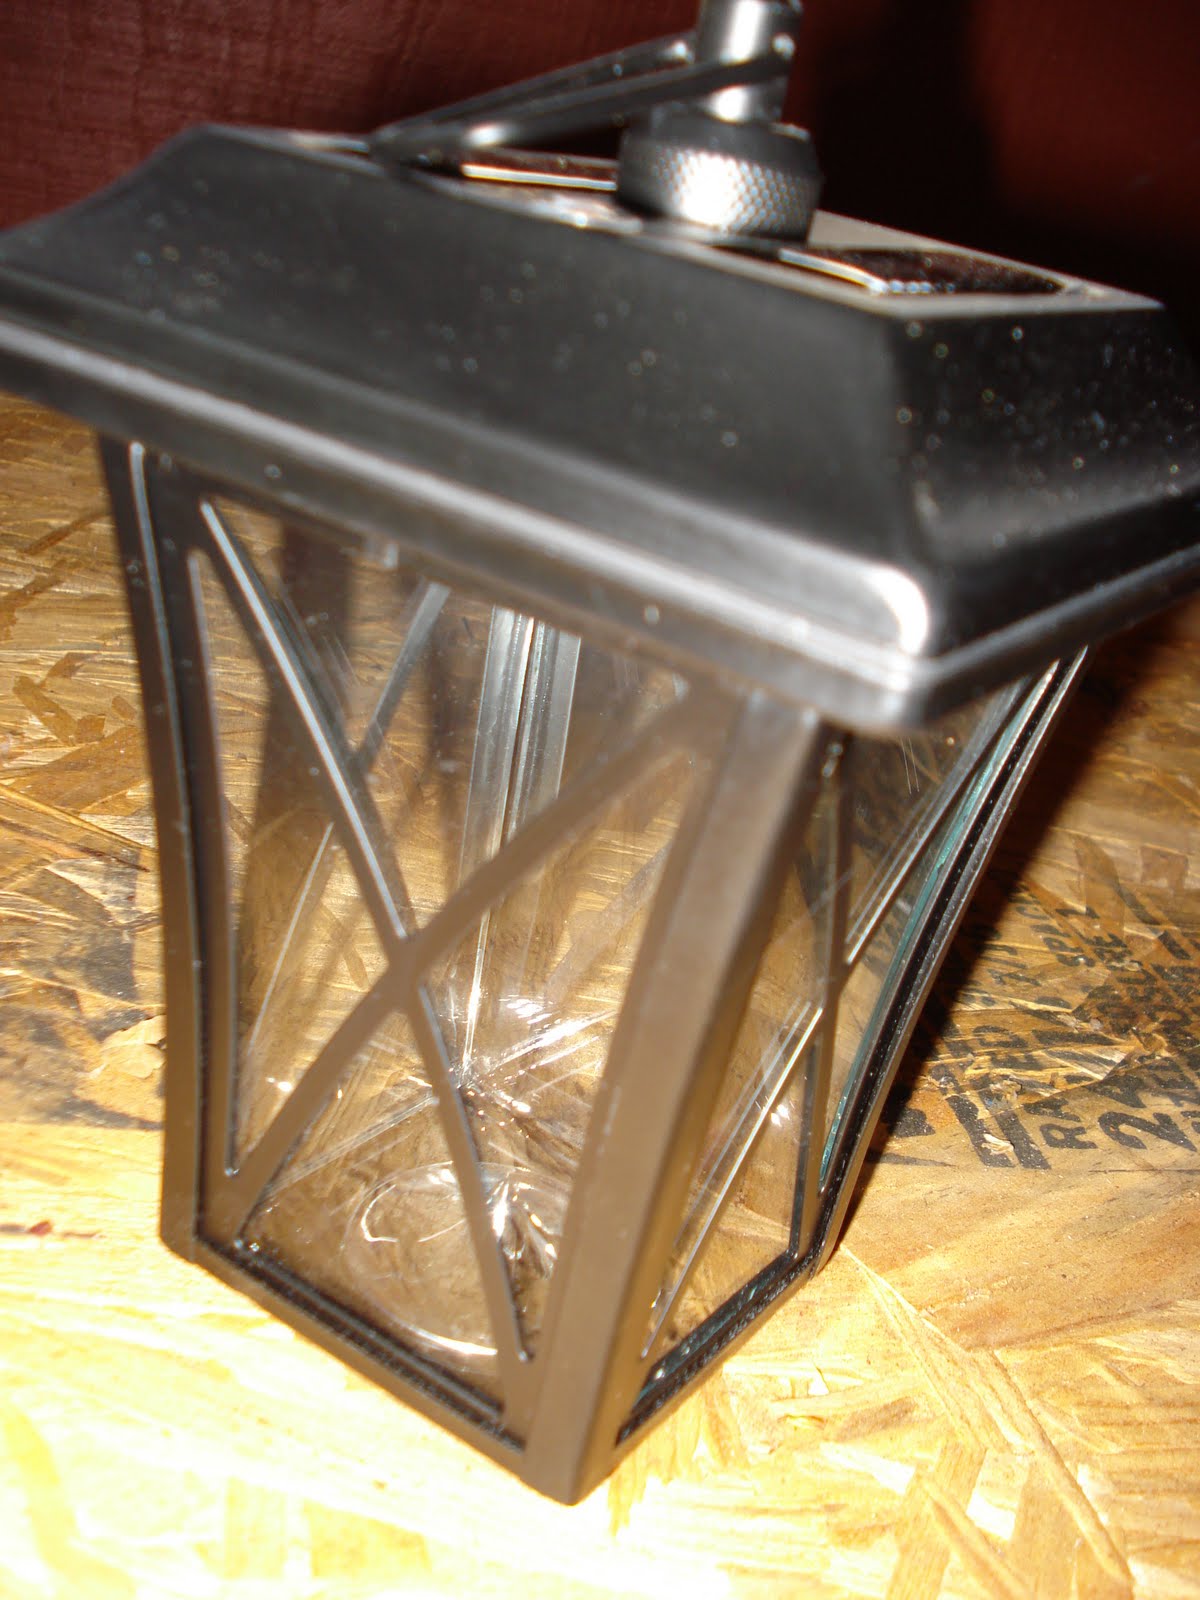
To avoid smearing on the lamp glass,

a cotton swab applied streaky detail.


A sodalite stone pendant

from my people give me stuff jewelry cemetery


with the center dangle removed.

Added a split key ring

for the easy hanging of ~~

a pool gate lamp!

Friday, July 16, 2010

Estate sale find


Called by many names - pin frog, kenzan, flower spikes, flower arranging frog, needle holder - these bases are particularly used in ikebana.

I bought an assload at a recent estate sale and here's a stack of them set against the background of my green dining room.


Tuesday, July 13, 2010

Party decorations for nuthin'


Last spring, my buddy Elizabeth and I were in an Anthropologie store, checking out the merch and like a goofball, I didn't take a photo of their fabulous window display of bright and happy flowers. What the hell?
But I did study the flowers intently and realized they were created from plastic water and soft drink bottles. You heard me. Trashy flowers. Sounds like a grunge band, huh?
The next day, the bottles haunted my brain, especially when I realized Rikki Tikki Tavi's big birthday shindig was approaching. Hello, great decorating idea!
I searched the 'net to find a braver soul's photos and sure as shit, a kickin' chick blogger Calamity Kim had these on flickr. Yay, Kim! (Thanks for allowing me to post your photo.)

(recycled bottles made into flowers
on spoke bicycle wheel
photography by Calamity Kim)

Baby sis RikTikTav saw the photo and approved. We collected plastic bottles while our brother Rollo blamed us for his increased intake of Diet Coke and said he made his son rinse with the soft drink after brushing his teeth because he was under the pressure to accumulate. Shut up and do your part, Rollo.

Bottles rinsed. Let's start cutting.
Sis and I quickly learned that even with the sturdiest scissors, a limited amount of bottles should be cut each day because our hands quickly became sore . . thinking all that tough plastic dulls the scissors and we absolutely do not trust ourselves with knives, box cutters or blade-like terror. Interestingly, the Diet Coke bottles were the toughest to cut. I shared the fact with Rollo and told him Diet Coke must bottle their product in super dense plastic because the ingredients are so corrosive. He didn't care and chugged down another.
The Rikster was in charge of the spray painting.
Fun technique: mist water onto flower then spray with paint. When the water evaporates, a spotty pattern remains. Paint the reverse side of bottle for a super shiny and glossy effect.


We wired the flowers to everything, including a floating life ring in the pool. Plus the white lights around the front door.


Dude, if it is plastic, we painted it.

That's a big ass flower!

Made from a big ass catering tray cover.


Sharing is caring good thing: three big trash bags stuffed with painted plastic flowers and our friends used them for their upcoming events. It's recycled times three!

Monday, July 12, 2010

& Pinwheels for free


Not content to stop with recycled soft drink bottle flowers, I cut up a dog food bag and made pinwheels.
(I was inspired by a forgotten blogger's scrapbook paper pinwheels but hellfire, I cannot remember/find the post. If you've seen it, please let me know so I can give credit.)

Dog or cat food bag, heavy duty plastic

Scissors

Paper fastener brads

Hole punch

String or wire

Cut a square of any size.

(Too large squares result in floppy pinwheels.)


Fold a corner over to determine center.

Mark it or eyeball it. Punch a hole in it.


From a corner toward the center,
make a cut,
leaving a 1/4" or so between the cut and the hole.
Repeat so you have 4 cuts.

Folding the corners toward the center
results in petal-shaped pieces.


Punch a hole in each corner.
From the bottom of one corner,
push a brad into the hole and
fold over toward the center hole.

Repeat, adding the remaining three sections
before pushing brad through center hole.


Secure brad by folding out the "wings".


Punch a hole in top "petal" and hang from string.

Watch the pinwheels flutter in the breeze.

~ OR ~

Wrap light weight floral wire around
brad wings on back for
continuous garland and add more pinwheels.

Cheap and easy, just like your ma!

Light saber t-shirts

Rikki Tikki Tavi gave me a few new T-shirts to embellish for the brat nephews. Knowing they are way into Star Wars these days,

  • I found a super easy tutorial for drawing light sabers HERE at DragoArt.
  • Traced the light beam onto a smaller paper backed piece of WonderUnder
  • Ironed the WonderUnder to reverse side of green cotton and yellow silk fabric scraps.
  • Traced light saber hilt separately onto that cool reflective fabric sample from Ernest.
  • Ironed fusible to fabrics.
  • Carefully trimmed fabric, using the previously traced lines.
  • Peeled off paper backing from fused fabric.
  • Ironed the 2 part light saber to shirts.
  • Machine stitched the light saber beam in matching thread.
  • Also on sewing machine, outlined the saber hilt with black thread for a subtle detail.


Heck, at this point,
I'm just hoping
the light sabers aren't
mistaken for dildoes.

Saturday, July 10, 2010

Tote bag recycle


Do you know what a chair back pocket is? It is sewn like a slipcover with pockets for school kids to store items at their desk.
Because next year's class doesn't use them, this kid's mom gave me his chair back pocket to disassemble for craft fabric but, instead, I recycled it into a tote bag. His name was already embroidered on it, so why not a sturdy heavy weight tote?
  • I sewed the open bottom closed and cut the top to form a bag.
  • Red bias tape applied to top cut edge.
  • Two plaid neckties were zigzagged and straight stitched for stability and reinforcement then stitched to bag for double straps.
Yay! A bag for transporting library books and such.

Sunday, July 4, 2010

Easy way to help with the oil spill clean up


Yes, I know BP is responsible for the damage but many volunteer groups are participating and you can help.
Craft Hope is distributing cloths to several institutions, including the Institute for Marine Mammal Studies in Gulfport, Mississippi but now need financial help to store, distribute and ship the cloths.
~~OR~~ send directly to the IMMS at 10801 Dolphin Lane, Gulfport, MS 39503. Package up your cloths and label package with cloth specifications and quantity to aid quick dispersal. Want to do more? Throw in a bottle of Dawn dishwashing liquid. (Why Dawn?)
The IMMS website wish list indicates towels (any size) but Craft Hope specifications indicated wash cloth and hand towel size to be helpful. Larger towels are unwieldy for cleaning and handling animals. Get out your scissors and cut 10" X 10" squares or 14" X 27" rectangles. Think absorbent and think throwaway. If it is soft enough to wipe your skin, it's good. Cut up your towels, sheets, wash cloths, whatever. Loose threads could snap on animals so if you can sew, zigzag or serge those raw edges.
T-shirts are perfect because they don't fray nor require edge finishing. Don't include the printed portions of the T-shirts as they aren't absorbent. Cut off the short sleeves and leave as is; a gloved hand fits perfectly into it.
Here is link to more details about cloth specifications.
Get your friends and family involved, combine your contributions, send a big box of cloths and know that you are part of the solution. Plus, you probably de-cluttered your t-shirt stash and linen closet!
Many thanks!!!